|
Navbars defined...
There's a lot of neat new features in Dreamweaver 3 and one of
our favorites is the Navbar behavior. Each of the four buttons on
our Navbar contains the Navbar behavior. Select a button, open the
behavior palette, and you'll see several Set Navbar Image
behaviors listed. The first one listed (onclick) is the most important
one and all you really need be concerned with. The settings you
make there will automatically set up the others. Double-clicking
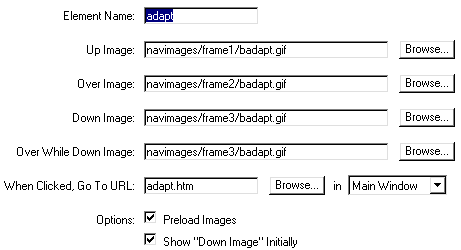
the top behavior opens a window that looks like the images below.
The window contains two tabs: Basic and Advanced... represented
by our two screen captures.
The Basic Tab

There are 4 button states we use:
- Up is how the button appears when the page first loads.
- Over is how it looks when you pass your mouse over it.
- Down is how it looks when you've clicked it.
- Over While Down is how it looks when you pass your mouse
over a button that is in the Down State.
You'll notice the file structure of the images listed above. frame1/badapt.gif
is the second button from the top on our navbar. It's stored in
a folder within this site called navimages/frame1. Each possible
state of our navbar has its images stored in a special folder so
you'll know where to find them! You must adhere to the naming convention
because these buttons also contain the patterned brown background
and that pattern must be matched in sequence (sort of like matching
wallpaper!). So not just any black button will suffice, it must
be from the proper frame.
Remember...
The four images entered into the Up, Over, Down, and Over While
Down fields are always going to have the identical file name (that's
legal because they're in different folders!)... But the Frame number
will always run from Frame1 in the Up state... to Frame4 in the
Over While Down state. Note that Tech Design does not use an Over-While-Down
state, so this Design Pack™ contains only 3 frames. However,
we are setting the OWD state to the identical image set in the Down
State because the script will be looking for an image.
This window also allows us to enter the page we want to open when
the button is clicked (Go to URL) and also allows us to specify
a frame or window target. Further options include preloading
images and Show Down Image initially.
This behavior is very powerful. When we set up these pages, we
created one Navbar and filled in the fields in both tabs of the
window. That is 99% of the work... because all that remains to be
done on a specific page is to simply check the Show Down Image
Initially box and all the rollovers... the whole tamale is automatically
scripted for us by Dreamweaver! Show Down Initially sets a button
(and its related rollover effects) to appear static when that page
is loaded. Just preview this page in a browser and it's evident
what happens.
The Advanced Tab
Note that this Design Pack™ does not ustilize the Advanced
Tab features because we are not using disjoint rollovers (a disjoint
rollover happens when you mouse over one image and an image somewhere
else on the page changes—other Design Packs™, however,
do make use of this feature).

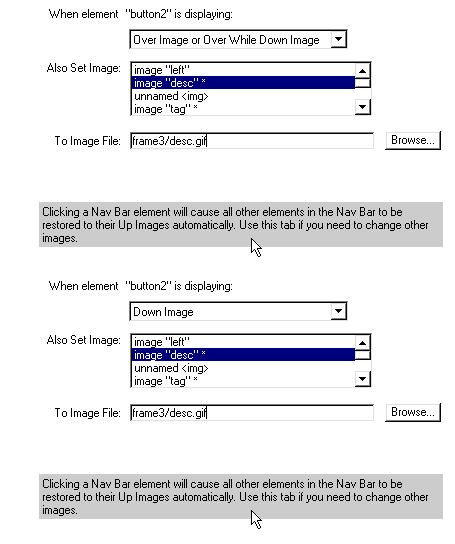
Here's where it all comes together! The advanced tab is where you
set up disjoint rollovers that swap additional images on your page.
Here we are showing the advanced tab for our Ozidesign Design
Pack™ and have set up 2 swaps that occur when the navigational
buttons are interacted with. In the above animated screen shot,
we see there are 2 conditions available for setting up the disjoint
swaps. These conditions describe the state of the trigger image,
in this case, the navigation buttons:
- (When the button is showing its) Over Image or Over While Down
- (When the button is showing its) Down Image
The next field says Also Set Image. That means we select
an image somewhere else on the page that changes when the criteria
in the first field is met. As you see in the screen shot, we've
selected image "desc" (the descriptions and labels
above our buttons) to change To Image File frame3/desc.gif
(desc.gif in folder named frame3). You can also see that image
"tag" has an asterisk next to it, which means that's
also been set. Although our screen shot does not show this, we've
also selected image "tag" to change to frame3/tag.gif.
The image swaps triggered while our button is showing its Over
Image, its Down Image, and its Over While Down Image
are all the same. This means that you set this up once for all pages...
and the only thing you need to do on a particular page is to select
the navigation button that corresponds to the page you're on and
than check the Show Down Image Initially box on the first
tab. Dreamweaver takes care of the rest!
If you have trouble comprehending this, relax a bit then come back
and read it again. It seems more complex than it actually is!
|


