StudioVII Design Pack™ User
Guide
Tech Design Pack
Studio VII Design Packs™ are your tickets to producing quick and gorgeous web sites. Most of the really hard work's already been done! These packs are designed specifically for (and work best with) the Macromedia Dreamweaver-Fireworks Studio—Version3. As with any valuable resource, it's recommended that you make a backup of this site and keep it in a safe place.
If you are new to Dreamweaver or Fireworks, it's highly recommended that you fully explore the online and printed documentation that came with those programs before attempting major modifications to a Design Pack site.
This User Guide will walk you through the site creation, text editing and image editing to get your site up and running in five easy steps. For the advanced user, we have also included technical material to allow you to fully utilize all of the hidden power contained in this design pack.
Browser Compatibility
This site will work in all version-3 browsers and up. IE3 (Windows) will not perform the swap images (rollovers) but the links will function without error. NN3 and IE3 will not render the CSS background, and body text will appear in whatever style and size visitors have set in their browser preferences. But we've provided an alternate background image if you'd like v3 browsers to render the background across the entire page. It's a larger file, so the choice is yours. This will be completely covered on the Images page.
Fluidity
The content tables we've designed are set to a fixed width of 600 pixels and are always centered. The navigational bar at the top of page is 600 pixels... so combined with the table structure, this site will scale down to a window size of 640 x 480 without generating horizontal scrollbars.
Templates
Dreamweaver templates are powerful tools that save you enormous amounts of time. Unlike the templates that come with other programs, Dreamweaver templates are created by you (or in this case, StudioVII), but you are free to modify it to your heart's content. Each time you change it and save it, you will be asked if you'd like to update the pages that are based on it. This site comes with four templates:
The 4 templates correspond to the 4 buttons of the Navbar. They are scripted so that the proper down state images show on page load. It's recommended, therefore, that when creating a sub-topic page that is related to button 2, you use template2. Place your sub-links in either the left or right sidebars and you'll have a logical and user-friendly navigation structure. Use the included Library Items to custom configure easily updatable text links for the sidebars as well as for the bottoms of each page.
Site Plan and Navigational Logic
Tech Design is a fictional company. This web site is composed of four main sections accessible from the navigational interface across the top of each page:
We have provided help and tutorial documentation to act as filler for these pages to give you an idea of how a completed site would look.... and to provide you with a valuable learning experience. As you acquire more Design Packs™, you will also be acquiring more tutorials... so save them in a safe place for future reference.
To use this Design Pack™ successfully, we suggest you group your content under the four main topics... adding sub-topic pages under the banner of a main topic page. You would normally insert links to these pages on a sidebar column within the main and sub-topic pages. You are not, however, constrained to just the four topics. You can add many more. (see the Advanced Techniques section for more details).
Summary
The whole idea behind Design Packs™ is to provide you with a web site that you can quickly tailor to suit your needs... or your client's needs. In that respect, you might call Design Packs™ Rapid Web Development Tools. If you work within the organizational layout of the Design Pack™, you can easily produce a top-notch web site in less than 2 hours— the bulk of your time devoted to content rather than design!
Archive Your Design Pack™
Define Your New Site
Now that your site is set up you can begin to edit the content directly in Dreamweaver. Simply highlight the existing text and begin to type in your own content. You will, of course, want to change the navigational bar headings and descriptions as well as the color and text styles. These topics are discussed below.
This site's text and background are driven via CSS. Text styles are contained in an external file in the root directory of the site that is named: dpone.css... The main fonts used in this site are Verdana and Trebuchet. These fonts are pretty much universal. If you do not have these fonts, Microsoft has them available for free download at its typography site. You will also need these fonts for editing your Fireworks images. The styles have been carefully chosen to complement the graphic design of this site and we suggest that you work with the pre-defined styles for consistent results. If you wish to change the fonts and color, the Style Sheet is easily modified:
To Edit a Style
Fonts
The CSS Fonts used in this site are: Verdana and Trebuchet. If for some reason,
you do not have these fonts, log onto to the internet and go to www.microsoft.com/typography/fontpack/default.htm
to download your free copies for either Windows or Mac.
Table Issues
The <td> tag has been redefined via our Style Sheet. Typing
into a table automatically renders text as:
{font-family: "Trebuchet MS", Verdana, Arial, sans-serif; font-size: 13px; color:
#666666}. If you want to change the style of a table cell, select its <td>
tag and pick a style from the CSS Styles Palette. Feel free to edit the
styles as you please.
You may change the background color(s) of any table cell, or the entire table itself.
If you are using the CSS-controlled background style, you can change the background color in the CSS editor (make sure you leave the background image as is, and just change the color).
You may also delete the entire table and begin from scratch building your own page layout.
Page Background
The Page Background is contained in each html page you generate from the Tech Design Master Pages (or from the supplied .dwt), and is not in the external CSS because Netscape 4 will not render CSS-defined page backgrounds unless the style is hard-coded in the page. The background image is very small and configured through CSS to tile only along the x-axis. The name of the style that controls the background is pgbg.
There are two ways to add new pages to your site, using New from Template or File-Save As. We suggest that you use the File-Save As method unless you have a very large site or are thoroughly familiar with Dreamweaver Templates.
Using Dreamweaver Templates
If you choose to use the supplied Dreamweaver Templates, simply select File-New from Template and choose the Template that corresponds to your page. There are 4 templates each representing one of the buttons on your Navbar. This is done to preserve the down state functionality of the interface, which provides a much more intuitive user experience. We cannot emphasize enough the power of Dreamweaver Templates and urge you to thoroughly read through both the printed and online documentation provided by Macromedia. Remember, Dreamweaver templates are not like Front Page themes!
To Create a New Page without using a Template
Changing the graphics in the navigation bar is a breeze with the Dreamweaver 3 and Fireworks combination. All individual graphics are easily edited and update to the site seamlessly. For the novice or for quick turnaround, you could simply change the text on the navigation bars to suit your needs and preserve the rest of the interface design... or you can modify the colors and textures or completely re-design the navigation with your own graphical design. The Fireworks png files are all located in the ..\local_file\fireworks folder. These files are for local editing only, Fireworks will render the gifs in the proper locations within your site.
To Edit the Navigation Bar Images
The Frames:
There are 3 frames for the Navigation bar, one for each button state. Open the Frames Window ( Alt-K) and be sure that the Frames tab is selected. You will see a list of 3 frames, frame1, frame2, frame3. Click a frame name to view or edit that frame. Select each frame and familiarize yourself with the text and image layout and compare it against the behavior of the actual Navigation Bar.
Make the Changes:
To update the changes to your site:
View the revised site:
Editing the Fireworks .png files...
To Change the transparent color before exporting:
To match the background color of your web page
To Create a New Image from a Master:
If you plan on a single new color for all the tables in your site, you can simply save the Fireworks .png file with the new canvas color and transparency... and use it as a kind of template to generate all your like images. Or, you can use the File > Save As command to create a new Fireworks .png for different images. Save the new .pngs in the local_files/fireworks folder.
Advanced Edits of the Fireworks Navbar file:
(Make sure you have a backup before proceeding!)
The most important point to remember when working with techface.png is that the tables that contain the current Navigation bar have a structure dependent on the size of the slices in the master file. So if you think you'll need to change the slice locations or the number of slices, it is strongly recommended that you do it before creating your web pages. You should attempt this level of edit only if you are a proficient Fireworks user.
After completion of your edit, follow the updating instructions at the top of this page... then open Dreamweaver and make any necessary changes to the table(s) that contain the navigation bar.
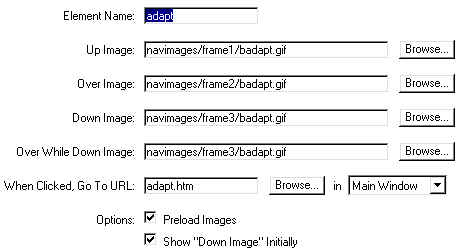
There are a lot of neat new features in Dreamweaver 3 and one of our favorites is the Navbar behavior. Each of the four buttons on our Navbar contains the Navbar behavior. Select a button, open the behavior palette, and you'll see several Set Navbar Image behaviors listed. The first one listed (onclick) is the most important one and all you really need be concerned with. The settings you make there will automatically set up the others. Double-clicking the top behavior opens a window that looks like the images below. The window contains two tabs: Basic and Advanced... represented by our two screen captures.
The Basic Tab
Note that the buttons are illustrated for reference and do not actualy appear
in the navbar window. Note also that the actual path to your images is probably
navimages/frame1/button2.gif.

There are 4 button states we use:
You'll notice the file structure of the images listed above. frame1/badapt.gif is the second button from the left on our navbar. It's stored in a folder within this site called navimages/frame1. Each possible state of our navbar has its images stored in a special folder so you'll know where to find them! You must adhere to the naming convention because these buttons also contain the patterned teal background and that pattern must be matched in sequence (sort of like matching wallpaper!).
Remember...
The four images entered into the Up, Over, Down, and Over While Down fields are always going to have the identical file name (that's legal because they're in different folders!)... But the Frame number will always run from Frame1 in the Up state... to Frame3 in the Over While Down state. If you don't use an Over While Down State, it's recommended that you fill in the field and just repeat the Down Image (usually from frame 3).
This window also allows us to enter the page we want to open when the button is clicked (Go to URL) and also allows us to specify a frame or window target. Further options include preloading images and Show Down Image initially.
This behavior is very powerful. When we set up these pages, we created one Navbar and filled in the fields in both tabs of the window. That is 99% of the work... because all that remains to be done on a specific page is to simply check the Show Down Image Initially box and all the rollovers, disjoint swaps... the whole tamale is automatically scripted for us by Dreamweaver! Show Down Initially sets a button (and its related rollover effects) to appear static when that page is loaded. Just preview this page in a browser and it's evident what happens.
The image swaps triggered while our button is showing its Over Image, its Down Image, and its Over While Down Image are all the same. This means that you set this up once for all pages... and the only thing you need to do on a particular page is to select the navigation button that corresponds to the page you're on and than check the Show Down Image Initially box on the first tab. Dreamweaver takes care of the rest!
If you have trouble comprehending this, relax a bit then come back and read it again. It seems more complex than it actually is!
The Advanced Tab
The advanced tab is not used in this Design Pack™... but would be used for changing the source of other images elsewhere on your page.
The image and scripts that drive this Design Pack™ Interface took a very long time to plan and implement. We thought we'd provide a short documentary on how we built it. This will also serve as a blueprint, to those of you who are experienced Fireworks users, should you decide to make major customizations to the navigation bar. Enjoy!
Slice 'em...
The images that make up the navigation bar were done in Fireworks 3, and the fully editable file resides in the local_files/Fireworks folder of this Design Pack™ and is named techface.png (Firework's native format). Every .gif image that comprises the navbar is contained in this single file. When we open it in Fireworks, we see something resembling the image below. The shaded areas represent the slices. Each slice represents a separate .gif image that Fireworks renders and saves upon export to our Dreamweaver site. As we can see, our techface.png has 8 slices. Look closer and we see how those images (slices) relate to the navbar on this page.

8 slices are in the image... noted by the shaded areas.
Frame 'em...
Our image spans 3 separate frames. A frame is a duplicate canvas which can contain variations from frame to frame. Another popular use of frames is in making animated .gif's... but our frames are employed for the sakes of efficiency and ease of editing. Now we know that our .png is the host of 24 distinct images destined for our web site (8 slices x 3 frames = 24).
Like an animation, we build our frames by first laying down the elements that will be common to each frame. The next step is drawing all the other elements contained in just the first frame. So frame 1 is complete. Frame 2 contains the over state of all four buttons (we simply change the color and size of each).
We duplicate this process for the remaining frame and that's how we created the master image.
Name the slices
Fireworks generates its own file names unless you first name your slices. The names FW chooses are not easy to work with after everything is set up and you're working with the images in Dreamweaver. If you're trying to pick the right image to swap in the navbar behavior window, and Fireworks has named your files, you will see something like this: r2_d2_c3po ...not very easy to guess what that might be. So we select our slices one by one and name them in the Objects Palette. And we give them names that are easy for us to recognize! No spaces and all lower case, please!
Meaningful structure...
Since we have 3 frames containing the images we will be exporting, we go into our Dreamweaver site and create five new folders:
The only things we will put into these folders are the images from our Fireworks file. Here's how we do it:
With frame1 selected in the Fireworks frames palette, we open the File Menu and select Export. We see a standard Windows or Mac file selection window and at the bottom are two most wonderful features (depicted below).

HTML:
![]()
The Base Name is moot because we named all our slices, so don't worry about it. The Slicing field allows you to select the slices in the current frame. Set HTML Style to none. We don't want Fireworks to create a table for us. We'll do our own!
In the Export window, we browse to our Dreamweaver site and drill down until we're in the folder called frame1... then click Save. Repeat this for all 3 frames. Now we've got our images in Dreamweaver.
Table it...
We now are ready to create our table. We know our base Fireworks image is 600pixels wide so let's create a 600px wide table with 4columns. Since the middle part of our image is going to require 5 rows, we'll do a 5 row table, but merge all the cells in columns 1, 2, and 4.
 |
 |
 |
|
Next, we place the images into our cells... like so:
 |
 |
 |
|
That's it!
For questions or comments, visit our web site at:
www.projectseven.com/dreamweaver/studio
Copyright and Trademark Notes:
Macromedia, Dreamweaver, and Fireworks are registered
trademarks owned by Macromedia, Inc. Studio VII Design Packs™ are trademarks
of Project Seven Development and are not affiliated with Macromedia.